
PNP Clearance Online Registration 2026: Simple PH Guide Now
Getting a PNP clearance is now easier because applicants can start the process online. The National Police Clearance System allows Filipinos to register, set an appointment, pay the fee, and visit a selected police station for photo and fingerprint capture. This saves time compared with the old process where applicants often had to wait in long lines without a confirmed schedule.
Still, many applicants face problems during the process. Some struggle with account registration, missing valid IDs, payment errors, unavailable appointment slots, wrong personal details, or confusion between PNP clearance and NBI clearance. These small issues can delay the release of the document, especially if the applicant needs it urgently for a job, visa, bank transaction, government requirement, or valid ID application.
This complete guide explains the PNP Clearance online registration process in the Philippines for 2026. It covers the meaning of PNP clearance, who needs it, requirements, accepted IDs, fees, appointment steps, payment methods, photo and fingerprint capture, release process, renewal, common problems, and practical tips to avoid delays.
What is PNP Clearance?
PNP clearance stands for Philippine National Police Clearance. It is an official document issued through the Philippine National Police system to certify whether a person has a criminal record or derogatory record in the Philippines.
A PNP clearance is commonly required for:
The clearance helps employers, agencies, banks, and institutions verify that the applicant has no police record based on the available PNP database. It is different from other local certificates because the National Police Clearance System is designed to process clearance applications through a centralized online platform.
PNP Clearance Online Registration 2026
PNP Clearance online registration in 2026 is done through the National Police Clearance System. The process usually includes four main stages:
Applicants must first create an account, complete their personal profile, choose a police station, select an appointment date, pay the fee, and visit the selected station on the scheduled date. Even though registration and payment are done online, applicants still need to appear personally for biometric capture.
Why PNP Clearance is Important
A PNP clearance is important because it acts as a record-check document. Many organizations require it before accepting an applicant, approving a transaction, or completing a formal process.
It is commonly used to prove that the person has no criminal or derogatory police record. For job seekers, it may be part of pre-employment requirements. For bank clients, it may support identity verification. For people applying for other official documents, it may serve as an additional supporting record.
In simple words, PNP clearance helps confirm a person’s identity and police record status.
PNP Clearance Online Registration Process
The PNP Clearance online registration process is simple if you prepare your documents before starting. Below is the complete step-by-step guide.

Step 1: Register an Account
First-time applicants need to create an account on the official National Police Clearance System website.
Follow these steps:
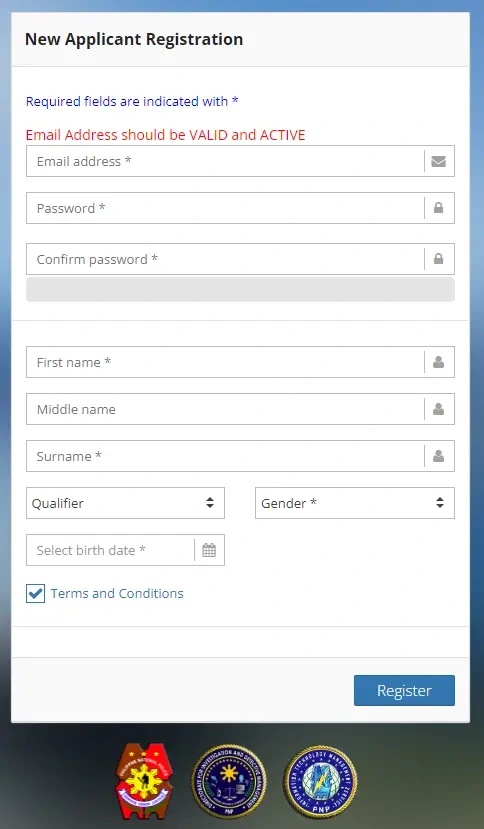
Important Tips for Registration
Step 2: Log In to Your NPCS Account
After confirming your email, go back to the official website and log in to your account.
You will need:
Once logged in, review your profile and make sure all details are correct. Wrong information can cause problems during verification at the police station.
Step 3: Complete Your Personal Profile
Before applying for clearance, you may need to complete your personal information in your account profile.
Common details include:
Always enter details exactly as they appear on your valid government-issued ID. This helps avoid mismatch issues during the appointment.
Step 4: Start the Clearance Application
After completing your profile, start the actual clearance application.
Follow these steps:
Step 5: Choose Your Preferred Police Station
The system allows applicants to choose a police station or clearance center based on availability. You should select a location that is convenient for you.
When choosing a police station, consider:
You must visit the same police station you selected during online appointment booking. If you go to a different station, your application may not be processed.
Step 6: Select Appointment Date and Time
After choosing a police station, select an available date and time. Appointment slots may vary depending on the station and applicant volume.
Tips for booking an appointment:
Step 7: Pay the PNP Clearance Fee
After confirming your appointment, proceed to payment. The system usually redirects applicants to online payment options connected with Land Bank or authorized payment channels.
The common fee mentioned by many applicant guides is around ₱160, which usually includes:
| Fee Item | Estimated Amount |
|---|---|
| Clearance fee | ₱150 |
| Transaction or convenience fee | Around ₱10 or more |
| Estimated total | Around ₱160 or more |
For 2026, applicants should always check the final amount shown on the official payment page because fees and convenience charges may change. There has also been a reported proposal to adjust the National Police Clearance fee, so the safest approach is to follow the exact amount displayed during payment.
Common Payment Options
Depending on the payment portal and availability, applicants may see options such as:
Only use the payment method displayed inside the official application process. Avoid sending money to personal accounts or unofficial pages.
Step 8: Save Your Reference Number
After successful payment, the system will generate a reference number or payment confirmation. This is very important because you need it during your station visit.
Save the following:
You can write the reference number on paper, save a screenshot, or print the confirmation page. It is better to have both a digital and printed copy.
Step 9: Visit the Police Station on Your Appointment Date
On your scheduled appointment date, go to the police station or clearance center you selected online.
Bring the following:
Some guides recommend bringing two valid government-issued IDs to avoid problems. Even if one ID is accepted in some cases, bringing two original valid IDs is safer because station requirements may vary.
Step 10: Photo and Fingerprint Capture
At the police station, your identity will be checked. After verification, the staff will capture your photo and fingerprints.
This step is required because the PNP clearance process uses biometric information. You cannot complete the full process online because your personal appearance is still needed.
The station may do the following:
Step 11: Clearance Release
After processing, you can get your PNP clearance at the selected police station. In many cases, the clearance may be released on the same day if there is no issue or record hit.
However, release time may depend on:
If your record is clear, processing may only take a short time after photo and fingerprint capture. If your name or record needs additional verification, release may take longer.
PNP Clearance Requirements for Online Registration
The requirements for PNP Clearance online registration are simple, but applicants must prepare them carefully.

Basic Requirements
Valid IDs for PNP Clearance
Applicants should bring original government-issued IDs for verification. Commonly accepted IDs include:
Valid ID Checklist
| Requirement | Recommended Action |
|---|---|
| Original valid ID | Bring the original copy, not only a photocopy |
| Clear name and photo | Make sure your ID is readable |
| Not expired | Use an ID that is still valid |
| Same personal details | Name and birthdate should match your application |
| Extra ID | Bring a second ID if available |
PNP Clearance Payment Guide
PNP clearance payment is usually completed online before the station visit. Applicants should not wait until the appointment date before checking payment status.
Payment Steps
- Complete your online application.
- Choose your police station and appointment schedule.
- Proceed to payment.
- Select the available payment method.
- Pay the required amount.
- Wait for confirmation.
- Save the reference number.
- Print or screenshot your proof of payment.
Payment Tips
- Use a stable internet connection.
- Do not refresh the page during payment.
- Take a screenshot before closing the payment page.
- Save the payment reference number immediately.
- Check your NPCS account after payment.
- If payment stays pending, wait for system confirmation before paying again.
- Do not pay through unofficial pages or unknown persons.
PNP Clearance Timeframes
Processing time can vary, but the online system is designed to make the process faster than traditional walk-in methods.
| Stage | Estimated Time |
|---|---|
| Online account registration | A few minutes |
| Email confirmation | A few minutes, but may take longer |
| Profile completion | 5 to 15 minutes |
| Appointment booking | A few minutes if slots are available |
| Payment confirmation | Usually quick, but may vary |
| Station visit | Depends on queue and station workload |
| Photo and fingerprint capture | Usually a few minutes |
| Clearance release | Same day in many cases if no issue |
| Additional verification | May take longer if there is a hit |
These are only general timeframes. Actual processing depends on the police station, system status, payment confirmation, and record verification.
PNP Clearance Validity
A PNP clearance is usually valid for a limited period. Many applicants treat it as valid for six months from the date of issue, but the exact validity should be checked on the printed clearance or with the requesting institution.
Some employers or agencies may require a newly issued clearance even if the document has not reached the usual validity period. Always follow the requirement of the company, agency, or institution requesting your clearance.
How to Renew PNP Clearance Online
You can renew police clearance online by following a similar process as a new application. Renewal still requires online access, appointment booking, payment, and personal appearance if biometric capture or verification is required.
PNP Clearance Renewal Steps
Renewal Tips:
PNP Clearance vs NBI Clearance
Many applicants confuse PNP clearance with NBI clearance. Both are used for background checking, but they are not exactly the same.
| Feature | PNP Clearance | NBI Clearance |
|---|---|---|
| Issuing agency | Philippine National Police | National Bureau of Investigation |
| Main purpose | Police record verification | Criminal and case record verification |
| Common use | Employment, bank, ID, local requirements | Employment, travel, visa, legal requirements |
| Application | National Police Clearance System | NBI online clearance system |
| Biometrics | Required | Required |
| Personal appearance | Required | Required |
| Scope | Police clearance record system | NBI record system |
If an employer or agency specifically asks for NBI clearance, PNP clearance may not be accepted as a replacement. If they ask for police clearance, then PNP clearance is usually the correct document.
Common Problems During PNP Clearance Online Registration
Applicants often face small problems that delay the process. Below are the most common issues and their solutions.
No Confirmation Email Received
If you do not receive the confirmation email, check your spam or junk folder first. Make sure you entered the correct email address during registration.
Solutions:
- Wait a few minutes.
- Check spam or junk folder.
- Search your inbox for NPCS or police clearance.
- Try logging in again.
- Use the password reset option if needed.
- Avoid creating many accounts with different emails.
Forgot Password
If you forgot your password, use the forgot password option on the login page.
Solutions:
- Click Forgot Password.
- Enter your registered email or username.
- Follow the reset instructions.
- Create a strong new password.
- Save the new login details.
Wrong Personal Information
Wrong name, birthdate, or address can cause problems during verification.
Solutions:
- Review your profile before booking.
- Correct editable details before submitting.
- Contact support or ask station staff if the system does not allow edits.
- Make sure your valid ID matches your application details.
No Available Appointment Slot
Some police stations may have limited appointment slots.
Solutions:
- Check again later.
- Choose another nearby police station.
- Book earlier before your deadline.
- Avoid peak days if possible.
Payment Pending
Payment may stay pending because of system delay, internet interruption, or payment gateway issues.
Solutions:
- Do not pay again immediately.
- Save your payment proof.
- Wait for confirmation.
- Check your NPCS account.
- Contact the payment provider or support if the status does not update.
Reference Number Lost
The reference number is needed during your appointment.
Solutions:
- Check your NPCS account.
- Review your email.
- Check screenshots or saved files.
- Look at your payment confirmation.
- Save a copy next time immediately after payment.
Name Has a Hit
A “hit” means your name or record may need additional verification. It does not always mean you have a criminal case. Sometimes it happens because another person has a similar name.
Solutions:
- Stay calm.
- Ask the station staff about the next step.
- Provide any additional information if required.
- Wait for verification.
- Follow the release schedule given by the station.
What to Bring on Appointment Day
Before going to the police station, prepare all requirements in one folder.
Appointment Day Checklist
Dress Code and Appearance Tips
Some stations may enforce basic dress and appearance rules. Since your photo will appear on your clearance, dress properly.
Recommended attire:
Looking presentable also helps avoid delays if the station has dress rules.
Can You Walk In for PNP Clearance?
The online system is designed for scheduled appointments, so applicants should register online before going to the police station. Walk-in processing may not be accepted in many locations, especially if the station follows appointment-based processing.
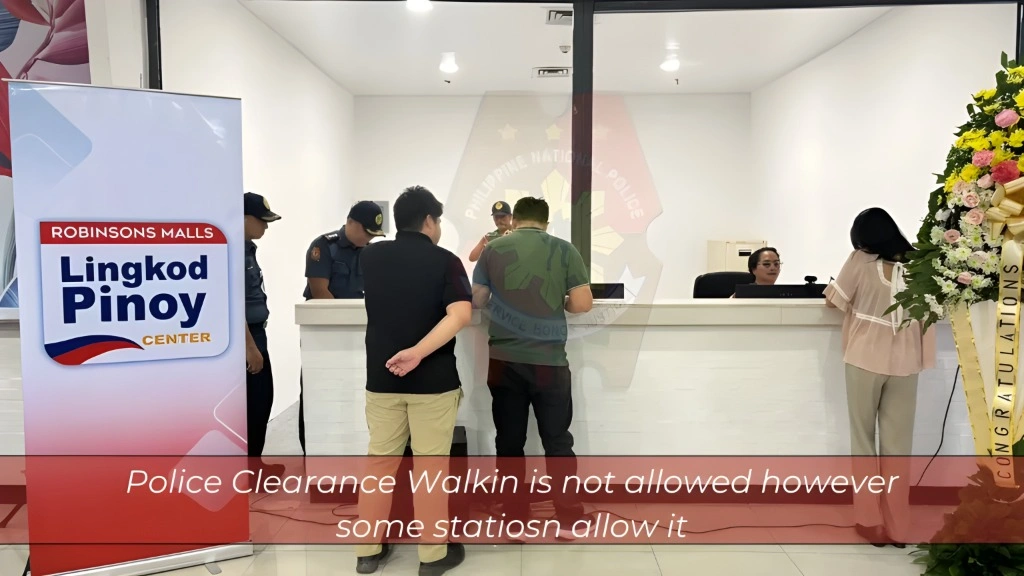
To avoid wasting time, create an account, book an appointment, and pay before visiting the station.
Can You Apply for PNP Clearance Without Online Registration?
In most cases, online registration is needed because the National Police Clearance System handles account creation, application details, appointment booking, and payment. Without online registration, the station may not have your application record in the system.
If you have no internet access, ask a trusted family member, friend, or computer shop to help you register. Make sure your personal details are accurate and your login information remains private.
Can Someone Else Claim Your PNP Clearance?
Personal appearance is required for photo and fingerprint capture. Because the clearance involves identity verification and biometrics, another person cannot complete the biometric step for you.
For claiming rules, ask the specific police station because policies may vary. It is still best to personally claim your clearance after processing.
PNP Clearance for Job Application
PNP clearance is commonly required by employers in the Philippines. It helps companies check whether an applicant has a police record.
If you need it for employment, choose employment or the closest correct purpose in the application form. Make sure the clearance is recent because some employers require a document issued within the last three or six months.
PNP Clearance for Bank Transactions
Banks may ask for police clearance as part of identity verification or documentation. If you need it for a bank transaction, check the bank’s exact requirement first.
Some banks may accept other valid IDs or documents, while others may specifically request police clearance. Always confirm before applying so you choose the correct purpose.
PNP Clearance for Valid ID Application
Some applicants use PNP clearance as a supporting document when applying for other valid IDs. It can help verify identity and record status.
However, acceptance depends on the agency or institution. Always check the requirements of the office where you plan to submit it.
PNP Clearance for Visa or Travel Requirements
Some visa or travel-related processes may ask for police clearance or criminal record documents. Before applying, check whether the embassy, consulate, employer, or agency requires PNP clearance, NBI clearance, or another specific police certificate.
Do not assume that PNP clearance and NBI clearance are interchangeable. Follow the exact document name required by the requesting institution.
Online Safety Tips for PNP Clearance Applicants
Because many applicants search for police clearance online, fake pages or misleading websites may appear. Always use the official website and avoid unofficial payment requests.
Safety tips:
How to Avoid Delays
You can avoid most delays by preparing early and checking your information before submission.
Helpful tips:
PNP Clearance Online Registration Checklist
Use this checklist before submitting your application.
| Task | Status |
|---|---|
| Active email prepared | Noted |
| NPCS account registered | Noted |
| Email confirmed | Noted |
| Personal profile completed | Noted |
| Purpose selected | Noted |
| Police station selected | Noted |
| Appointment date chosen | Noted |
| Payment completed | Noted |
| Reference number saved | Noted |
| Valid ID prepared | Noted |
| Extra ID prepared | Noted |
| Appointment confirmation saved | Noted |
| Station visit completed | Noted |
| Clearance released | Noted |
Frequently Asked Questions
Final words
PNP Clearance online registration in the Philippines is now more convenient because applicants can create an account, book an appointment, and pay online before visiting the police station. This helps reduce long waiting times and makes the process more organized.
To avoid delays, use the official website, enter correct personal details, prepare valid IDs, save your reference number, and arrive on time for your appointment. If you need the clearance for a job, bank transaction, valid ID, visa, or other requirement, apply early so you have enough time for verification and release.
The process is simple when you follow each step carefully. Register online, book your appointment, pay through the official payment process, visit your chosen police station, complete photo and fingerprint capture, and claim your PNP clearance after processing.